2015-10-08 10 views
6

Mam wykres słupkowy plotly.js, który próbuję uzyskać porządek w osi kategorycznej. Każda kategoria ma jeden pasek, ale czasami są zielone, a czasem żółte. Paski powinny być w kolejności od najwyższego do najniższego, ale sprytnie wydaje się, aby zamówić je na podstawie różnych wypełnień.Categoryczna kolejność osi w plotly.js

Dane:

var data = [ 
    { 
    "marker": { 
     "color": "#006666" 
    }, 
    "x": ["A:0122", "A:0121", "A:0434", "A:0838", "A:0083", "A:0081", "A:0687"], 
    "y": [1246.0, 1096.0, 1000.0, 200.0, 0.0, 0.0, 0.0], 
    "name": "Green", 
    "type": "bar" 
    }, 
    { 
    "marker": { 
     "color": "#C87B31" 
    }, 
    "x": ["A:0169", "A:0175"], 
    "y": [270.0, 0.0], 
    "name": "Yellow", 
    "type": "bar" 
    } 
]; 

Układ:

var layout = { 
    "margin": { 
     "t": 0 
    }, 
    "barmode": "stack", 
    "tickangle": -90, 
    "showlegend": true, 
    "xaxis": { 
     "title": "Idea", 
     "tickmode": "array", 
     "tickvals": ["A:0122", "A:0121", "A:0434", "A:0169", "A:0838", "A:0083", "A:0175", "A:0081", "A:0687"] 
    }, 
    "yaxis": { 
     "title": "Result" 
    } 
}; 

Inne Configuation:

{"showLink":false, "displaylogo":false} 
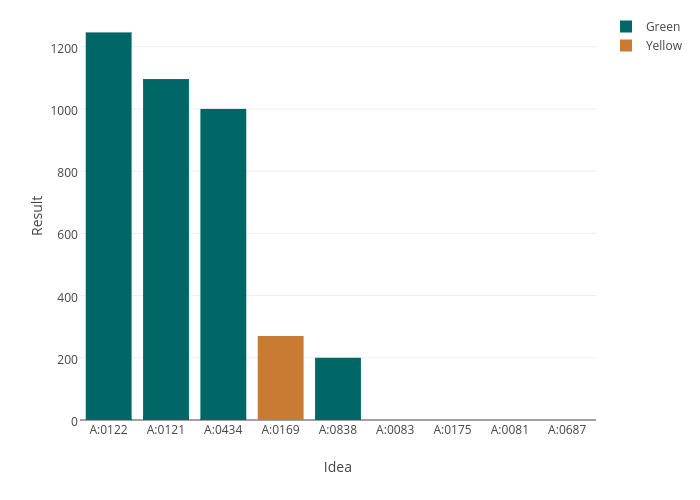
Ale oto wynik:

enter image description here

Zauważ, że "A: 0169" powinno być czwartym paskiem, ale zamiast tego jest ostatnim.

Jak ustawić paski w kolejności określonej w tickvals? Czy mogę określić ich kolejność w inny sposób?

Odpowiedz

7

Można ustawić x i tickvals do uporządkowanej tablicy następnie dodać etykiety OśX z ticktext tj danych:

[{ 
    "marker": {"color": "#006666"}, 
    "x": [0, 1, 2, 4, 5, 7, 8], 
    "y": [1246.0, 1096.0, 1000.0, 200.0, 0.0, 0.0, 0.0], 
    "name": "Green", 
    "type": "bar" 
    }, { 
    "marker": {"color": "#C87B31"}, 
    "x": [3, 6], 
    "y": [270.0, 0.0], 
    "name": "Yellow", 
    "type": "bar" 
    }], 

układ:

{ 
    "margin": {"t": 0}, 
    "barmode": "stack", 
    "tickangle": -90, 
    "showlegend": true, 
    "xaxis": { 
     "title": "Idea", 
     "tickmode": "array", 
     "tickvals": [0, 1, 2, 3, 4, 5, 6, 7, 8], 
     "ticktext": ["A:0122", "A:0121", "A:0434", "A:0169", "A:0838", "A:0083",    
        "A:0175", "A:0081", "A:0687"] 
    }, 
    "yaxis": { 
     "title": "Result" 
    }} 

Ewentualnie, jeśli dotyczy tylko koloru prętów, które można narysować jeden t rasa i zestaw kolorów jako tablica:

var data = [{ 
     "x": ["A:0122", "A:0121", "A:0434", "A:0169", "A:0838", "A:0083", 
      "A:0175", "A:0081", "A:0687"], 
     "y": [1246.0, 1096.0, 1000.0, 270.0, 200.0, 0.0, 0.0, 0.0, 0.0], 
     "type": "bar", 
     "marker": {"color": ["#006666", "#006666", "#006666", "#C87B31", 
        "#006666", "#006666", "#C87B31", "#006666"]} 
    }], 
    layout = { 
     "margin": {"t": 0}, 
     "xaxis": {"title": "Idea"}, 
     "yaxis": {"title": "Result"} 
    }; 
1

Od Plotly.js 1.10.2, można użyć categoryorder i categoryarray kontrolować kolejność osi kategorycznego. W ten sposób można zachować x jako listę ciągów.

Zastosowanie:

var data = [ 
    { 
    "x": ["A", "D", "B"], 
    "y": [1, 2, 3], 
    "type": "bar" 
    }, 
    { 
    "x": ["C", "E"], 
    "y": [2, 3], 
    "type": "bar" 
}]; 

var layout = { 
    "xaxis": { 
     "categoryorder": "array", 
     "categoryarray": ["A", "B", "C", "D", "E"] 
    } 
}; 

Dla dokładnej przykład:

var data = [{ 
    "marker": { 
     "color": "#006666" 
    }, 
    "x": ["A:0122", "A:0121", "A:0434", "A:0838", "A:0083", "A:0081", "A:0687"], 
    "y": [1246.0, 1096.0, 1000.0, 200.0, 0.0, 0.0, 0.0], 
    "name": "Green", 
    "type": "bar" 
}, { 
    "marker": { 
     "color": "#C87B31" 
    }, 
    "x": ["A:0169", "A:0175"], 
    "y": [270.0, 0.0], 
    "name": "Yellow", 
    "type": "bar" 
}]; 

var layout = { 
    "margin": { 
     "t": 0 
    }, 
    "barmode": "stack", 
    "tickangle": -90, 
    "showlegend": true, 
    "xaxis": { 
     "title": "Idea", 
     "categoryorder": "array", 
     "categoryarray": ["A:0122", "A:0121", "A:0434", "A:0169", "A:0838", "A:0083", "A:0175", "A:0081", "A:0687"] 
    }, 
    "yaxis": { 
     "title": "Result" 
    } 
}; 

Wynik: